Learn with

Using Conditions and Switches
Implement conditional logic in your flows.
Understanding Conditions
Conditions are like the traffic signals in your flow - they tell it when to go left and when to go right based on certain conditions.
How to Set Up Conditions using practical example:
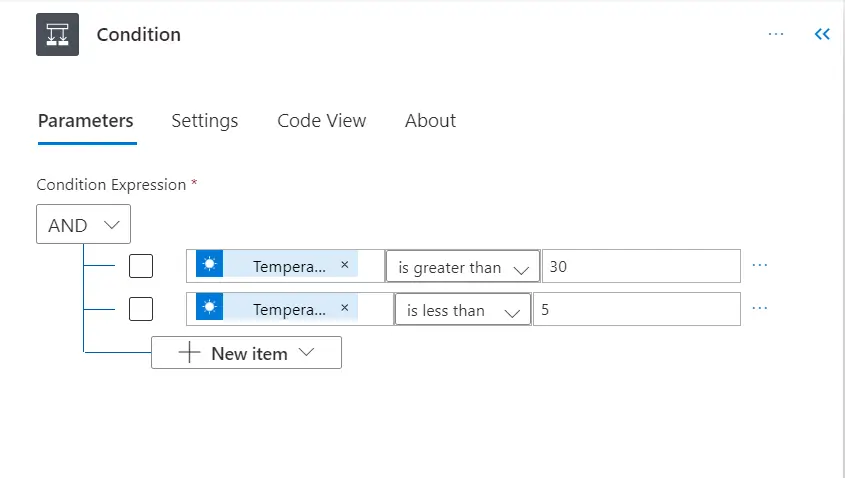
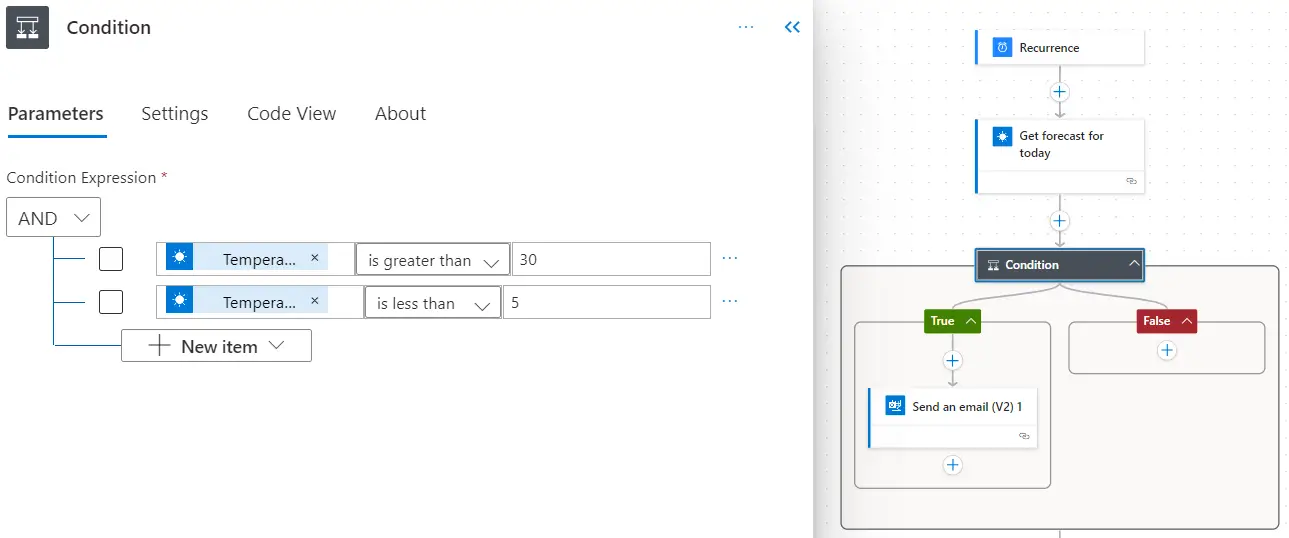
Scenario: You want to send an email notification only if the temperature is above and below from a certain threshold.
Step 1: Add a Condition
- After adding the trigger, click on the "" symbol to add an action.
- In the search bar, type "Condition" and select the "Control - Condition" action.

Step 2: Define the Condition
- The condition box appears. Click on "Choose a value" to define the condition.
- In the dynamic content panel, select the field you want to check. For our scenario, it's the temperature high and low Choose the operator. In this case, select "is greater than" for temperature high and "is less than" for temperature low.
- Set the value. Enter 30 since we want to check if the temperature high is above 30 and temperature low is below 5.
Step 3: Configure Actions for True and False
- Based on whether the condition is true or false, add the corresponding actions.
- Click on "Add an action" inside the "If yes" box for true conditions.
- Search for and add the action you want, like sending an email.
- Repeat the process for the "If no" box for false conditions.

Understanding Switches
Switches take decision-making up a notch. They're like flowcharts for your flow, letting it choose from different paths based on various conditions.
How to Implement Switches using real world example:
Scenario: You want to send different reminders based on the day of the week.
Step 1: Choose a Trigger
- Select a trigger. For this example, choose a trigger related to time, like "Recurrence", and set it to run daily.
Step 2: Add a Switch
- After adding the trigger, click on the "" symbol to add an action. In the search bar, type "Switch" and select the "Control - Switch" action.

Step 3: Define the Switch Expression
- The switch box appears. Click on "Choose a value" to define the switch expression.
- Use the expression builder to select the current day of the week, for example, formatDateTime(utcNow(), 'dddd').
Step 4: Configure Cases
- Add different cases based on the possible values of the current day of the week.
- For example, create cases for "Monday" and "Tuesday”.
Step 5: Configure Actions for Each Case
- Inside each case, add the corresponding actions.
- Click on "Add an action" inside each case.
- Search for and add the "Send an email" action.
- Customize the email content based on the day of the week. For example, send different reminders for Monday, Wednesday, and Friday.

Step 6: Save and Test
- Once you've configured your actions, click on "Save" to save your flow.
- Test your flow by triggering the specified event, such as waiting for the next scheduled run and checking the emails sent.