Learn with

Understanding Data Source (Dataverse)
Dataverse in Power Apps is a data platform provided by Microsoft for building structured, secure, and scalable applications. It acts as a centralized database for your apps, allowing you to create, store, and manage data tables with defined relationships, security settings, and data validation rules. You can use this structured data to build web-based applications using Power Apps, integrating seamlessly with other Microsoft services. Dataverse ensures data integrity, privacy, and scalability for your applications. It's an ideal choice for businesses looking to create custom apps with structured data and minimal coding.
These are some of the common data types you can define when working with tables and entities in Power Platform Dataverse. The choice of data type depends on the nature of the data you're managing and the requirements of your applications and business processes.
Data Type |
Description |
Example |
|---|---|---|
| Single Line of Text | A single line of text data. It's typically used for short descriptions or labels. |
Customer Name, Product Code |
| Multiple Lines of Text | A longer text field that can hold multiple lines of text. | Description, Comments |
| Whole Number | An integer data type for whole numbers. | Order Quantity, Age |
| Decimal Number | A floating-point number with decimal precision. | Price, Latitude, Longitude |
| Date and Time | A field for storing date and time values. | Order Date, Meeting Time |
| Option Set | A predefined list of values that users can select from. | Status (Open/Closed), Priority |
| Two Options | A binary choice field, often used for yes/no or true/false options. | Approval (Yes/No), Gender |
| Image | A data type for storing image files. | User Profile Picture, Product Image |
| Lookup | A reference to another record in Dataverse. | Customer (related entity), Parent Record |
| Customer | A reference to a contact or user record. | Associated Customer, Owner |
| Currency | A data type for storing currency values. | Total Revenue, Price Per Unit |
| URL | A field for storing website or hyperlink addresses. | Website URL, Hyperlink to Document |
| A field for storing email addresses./td> | Contact Email, User Email | |
| Phone | A field for storing phone numbers. | Contact Phone, Support Hotline |
Why use Dataverse
- Relationships: Dataverse supports creating relationships between tables, including one-to-one, one-to-many, and many-to-many relationships. This is particularly useful when you need to model complex data structures and maintain data integrity.
- Data Modeling: You can define data types, rules, and business logic (such as validation rules and calculated fields) within Dataverse to ensure data quality and consistency.
- Security and Permissions: Dataverse provides role-based security to control access to data. You can set up permissions to determine who can read, write, or modify data in your tables. This ensures data privacy and compliance.
- Integration: Dataverse is tightly integrated with other Microsoft services like Power Automate, Power BI, and Dynamics 365. You can easily connect and share data between these services, making it an ideal choice for end-to-end business applications.
- Web-Based App Creation: You can use Power Apps to create web-based apps that interact with Dataverse. Power Apps provides a visual interface for designing your app's user interface and logic, and you can use Dataverse as the data source for your app.
- Canvas and Model-Driven Apps: Power Apps allows you to create different types of apps. Canvas apps provide more flexibility and are suitable for custom app development, while model-driven apps are suitable for scenarios where data-driven apps are more appropriate.
Creating Dataverse table
Let’s create a Dataverse table for our application
- Select the solution we have created in previous step:
- Solutions are containers for organizing and managing your app components, including tables.
- You can either create a new solution or select an existing one. To create a new solution, click on "Solutions" in the left sidebar, then click the "New Solution" button.
- Add a New Table to the Solution: Within your solution, you can add a new Dataverse table.
- Click on the solution name to open it.
- Inside the solution, click the "New" button and select "Table" from the options.
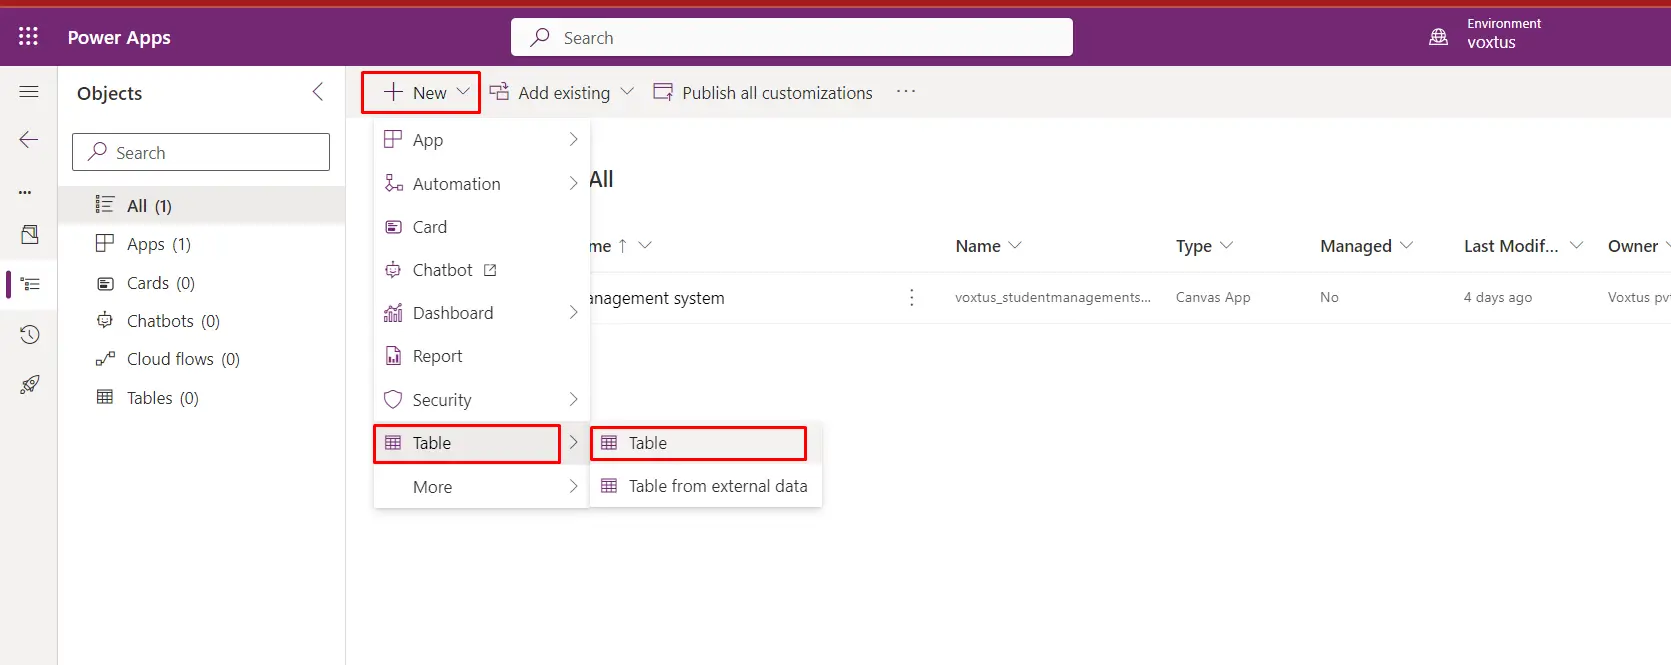
- Define Table Properties: IN the table creation dialog, provide the following details for your new table: Display Name: Give your table a name, such as "Person" or any name you prefer.
- Name: This will be the technical name of the table and should be unique in your environment.
- Primary Name Column: Set this to "Full Name" since it's a common identifier for people.
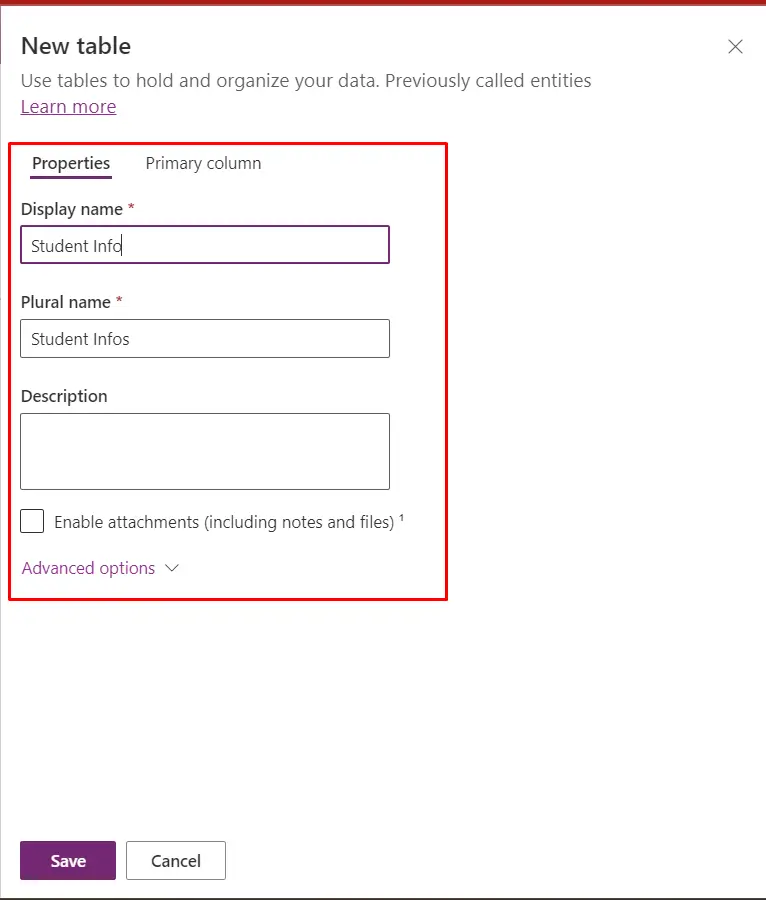
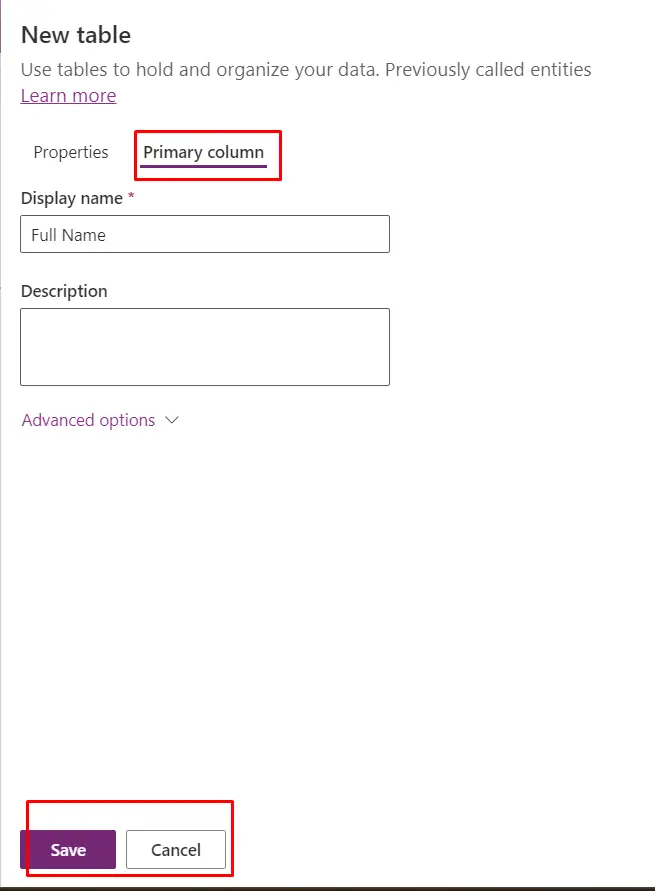
- Description: Add an optional description for your table.
- Define Columns:
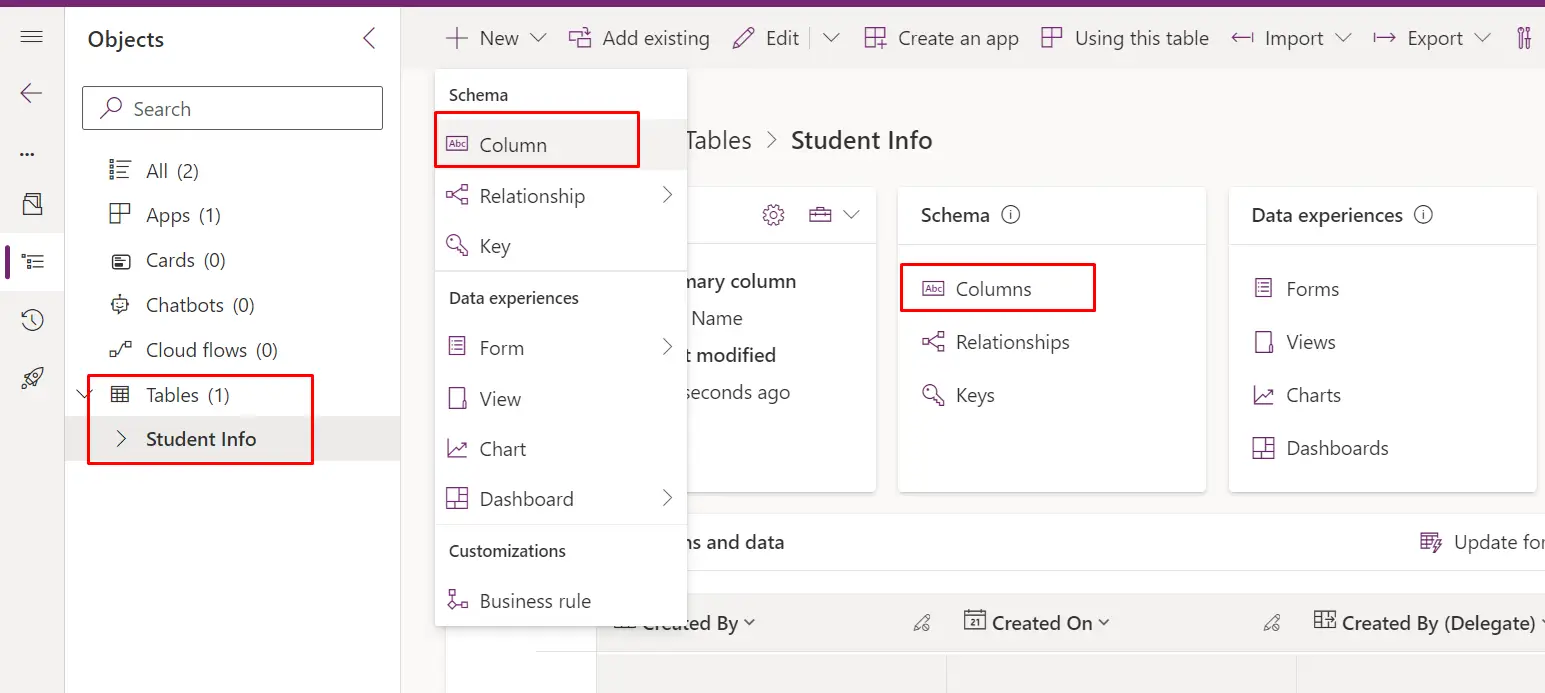
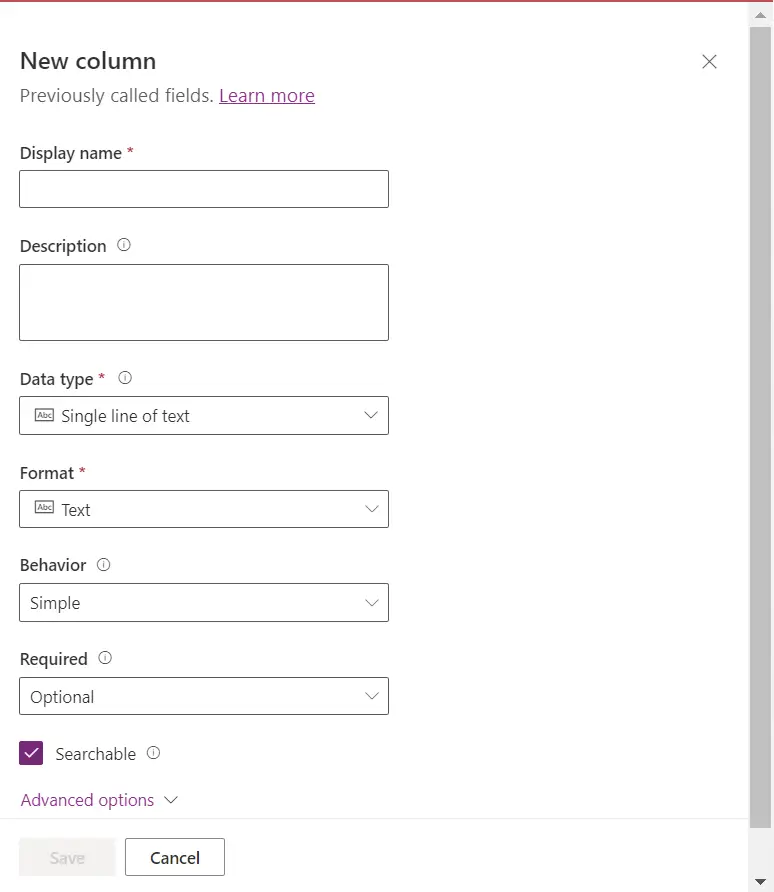
- After creating the table, you will be taken to the table's design view.
- Click on "Add column" to add columns for First Name, Last Name, Full Name, and Age.
- For each column, set the following properties:
- Name: Enter the column name (e.g., "First Name," "Last Name," "Full Name," "Age," ”Class,” and ”DOB”).choose data type of class column as choice to make Class column as choice column. And Full name is already there because we have made full name as primary column of the table.
- Data Type: Choose the appropriate data type for each column (e.g., Single Line of Text for names, Whole Number for age).
- Repeat the previous task to create all columns individually.
- It will look like this:
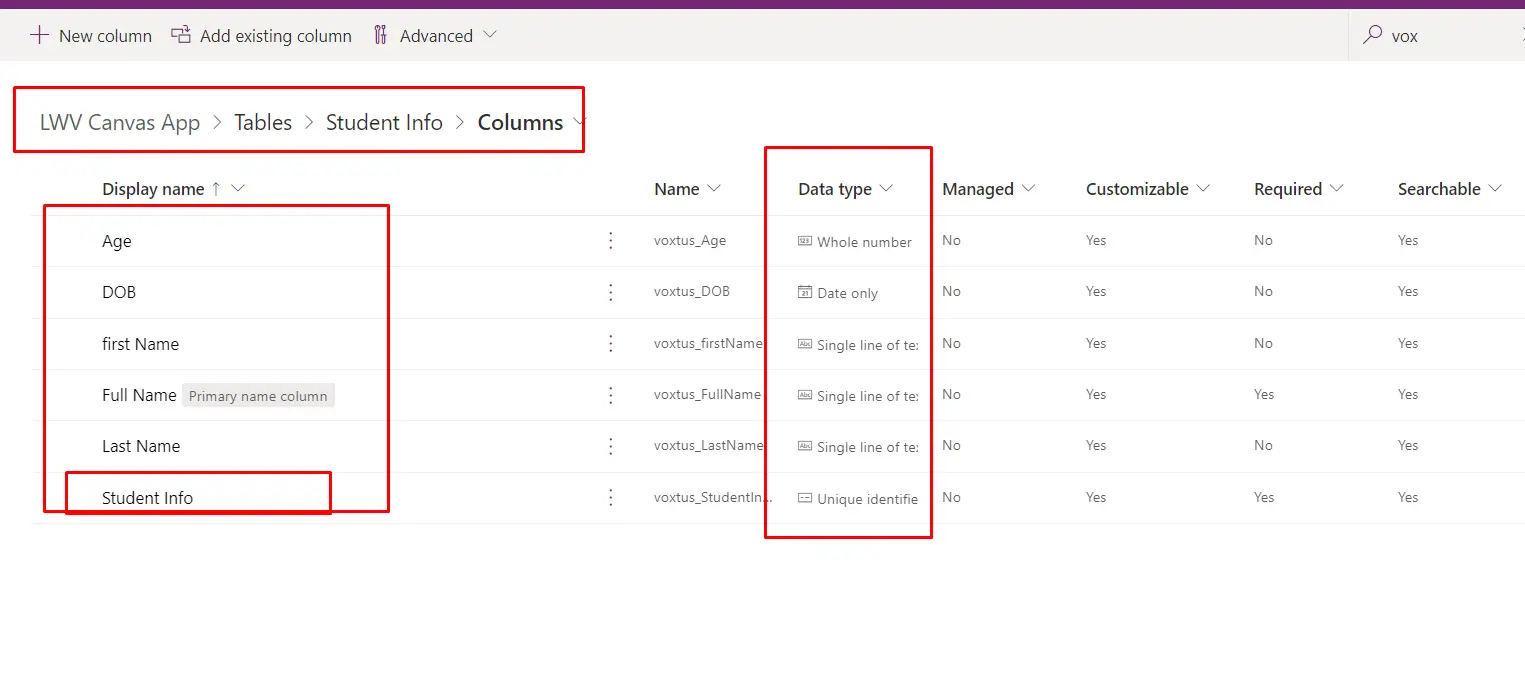
In this above image you can see the data type and name of all the columns in have created and Student info is the unique identifier which is created by Default.
- Save and Publish: Once you have defined the table and its columns, click the "Save" button within your solution. After saving, you can choose to publish your changes to make the table and columns available for use in your solution.